Make a simple mosaic
OK, you've downloaded more than one post-BCD mosaic of your target, in this example, the Orion Nebula Cluster. How can you combine them into one mosaic?
Step 0. Make a directory called something useful, like "orion." Put all the zip files that the SHA gives you in there. Unzip them. After you unzip all the files that you have downloaded, you will have several directories on your disk, each of which is labeled by the letter "r" followed by a 7-digit number. This 7-digit number is the AORKEY, e.g., a unique identifier for that observation. For my example, I downloaded all four channels of the post-BCD data from program 43, but nothing from any other program. I have nine directories: r4097792, r4098048, r4098304, r4098560, r4099840, r4100096, r4100352, r4100608, and r4182528.
Now, we will use a program called MOPEX to combine the mosaics. In order to do this, we need to tell MOPEX which files we want to combine. MOPEX needs at minimum not only the individual mosaics from each one of these AORs, but also the individual mosaics of the errors.
1. If you need to, go and grab the MOPEX software for your platform, follow the directions, install it, and start it up. Make sure that, under the "Options" menu, the option "Use Automatic Version Update" is selected. If this is the first time you have installed MOPEX, you will probably have to wait a few seconds, and then MOPEX will say that there is a new version of the software available. Let it go and grab the new version and restart.
Note: From here forward, we are assuming you are on a unix-based (unix, linux, mac) machine, which is recommended not just for the tricks and things below, but also for speed and reliability. There is a separate page with hints and tips for using MOPEX on windows. Also see Unix cheatsheet for a list of common commands.
2. Create (plain text) lists of files for MOPEX to use. As described above, it needs at least the main data (*maic.fits) and the errors (*munc.fits). On a linux machine or from a Mac terminal window, you can get these lists as follows. cd into your 'useful' directory (called "orion" above) where you unpacked all the data. Then do this:
ls r*/ch1/pbcd/*maic.fits > ch1mos.txt
ls r*/ch2/pbcd/*maic.fits > ch2mos.txt
ls r*/ch3/pbcd/*maic.fits > ch3mos.txt
ls r*/ch4/pbcd/*maic.fits > ch4mos.txt
ls r*/ch1/pbcd/*munc.fits > ch1err.txt
ls r*/ch2/pbcd/*munc.fits > ch2err.txt
ls r*/ch3/pbcd/*munc.fits > ch3err.txt
ls r*/ch4/pbcd/*munc.fits > ch4err.txt
Each one of these lists now contains one filename per line, for more than 230 lines per channel for the Orion example. If you picked another region, you might have just a few files here.
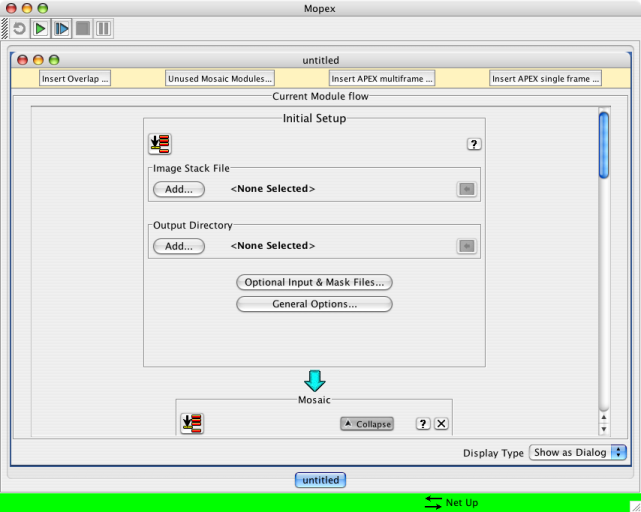
3. By now, MOPEX should have updated and restarted. Go up to the File menu and choose "new Mosaic pipeline." Pick the channel you want - try IRAC channel 1. When it comes back, it will have a window that looks like this:
4. Under the "Image Stack File" part of the window, click on "add" and pick the file that is the list of the *maic files you want to combine -- make sure you choose the same channel as the template you just selected. (If you picked "IRAC channel 2" on the previous step, pick the list of IRAC channel 2 files.) For this example, try IRAC channel 1 (ch1mos.txt in the above).
5. Under the "Output Directory" part of the window, click on "add" and pick a place for MOPEX to put its (copious) output. You may need to manually create the directory outside of MOPEX first (from a terminal window). You may wish to name the directory something useful like "ch1mosaic" or similar, for whatever channel you are combining.
6. Click on "Optional Input and Mask Files." In the pop-up window, under "sigma list file", click on "add" and pick the file that is the list of the *munc files you want to combine -- make sure you choose the same channel as the template you just selected. (If you picked "IRAC channel 2" on the previous step, pick the list of IRAC channel 2 files.) For this example, try IRAC channel 1 (ch1err.txt in the above).
7. Click OK in the popup window.
8. Go up to the top left of the window and hit the green button that looks like "Play" on a DVD player. Sit back and watch it run. You may need to go get a(nother) soda.
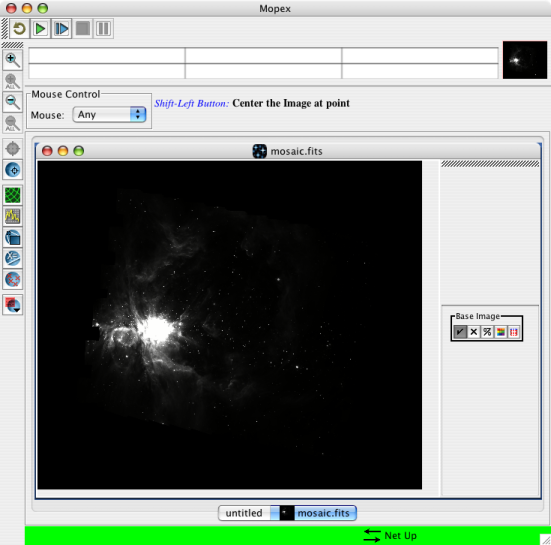
9. After it finishes, you can click on the button in the last part of the last module it runs to load the mosaic. The mosaic is actually stored in the output directory you selected, under a directory called "Combine-mosaic." The file is called "mosaic.fits." Mine looks like this for the ONC for IRAC channel 1:
10. Repeat as necessary for other channels, other observations....
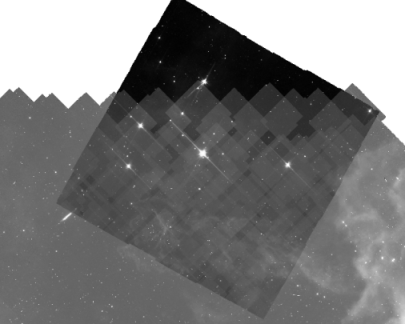
11. Note that if you are combining data taken at wildly different times during the mission, Spitzer moves. It moves through a clump of dust that is trailing the Earth. So that clump of dust changes the background level a LOT. Depending on what channel you are combining, and the time span between images, you might not notice a change in the background. BUT, here is an example of an observation where the backgrounds are wildly different between various pieces of the mosaic.
Note that there is a black-background part of the mosaic at the top, and then you can see the higher-background individual frames from the newer mosaic on the bottom. If your mosaic looks like this, you will probably need to start from the individual BCDs.


